Conventional round plastic containers are notorious for deformed root systems. The problem occurs with all plants of all species. However, the severity of the problem is greatest with woody trees and shrubs which need good anchorage to support the tops. Cutting or disrupting congested and circled roots at planting is often suggested, but numerous research studies have shown no benefits. Simply cutting holes in container sidewalls does almost nothing to help. In 1968, I created holes in sidewalls of one gallon containers only to find no benefits. In 1986, I created a series of larger triangular openings in smooth walled containers in an attempt to stop root circling. However, as roots grew out and were deflected along the curved sidewall, they grew past the openings and continued to circle. In addition, growth media exposed through the many and sizeable openings increased water loss, salt accumulation and weed problems.
With the entire sidewall of outward projecting, downward sloping, and pyramidal cones, RootBuilder®, Patent #7,481,025, solves the circling root problem in a unique way. Each cone is one inch square at the base and tapers to a small opening at the tip. All of the openings amount to less than 5% of the sidewall surface area. This keeps water loss due to evaporation to a minimum. As roots grow out and contact the container sidewall, each root tip is guided into one of the cones and is air-root pruned at the tip.
Each outward projecting cone slopes downward slightly on the bottom, but slopes much more on the top. Due to the effect of gravity, most roots grow along the bottom of the cone as they extend toward the opening. This feature helps protect active root tips from heat stress and decreases chance that a weed seed will blow against the sidewall and germinate. With the steep upper slope, most weed seeds are washed off with the next rain or irrigation. In addition, because of the shaping and positioning of the outwardly projecting cones, each cone partially or completely shades the one below. This shading of one cone by the other keeps the sidewall much cooler, and allows roots to survive on the sunny side of the container even thought the container is black.
Figure 1. Used as a quart size container, an extremely fibrous root system is created on a small plant. This size is particularly suited for grafting stock because stout stems are created. The container may be used over and over.
When a root tip is pruned by air/dehydration, additional secondary roots are promptly produced back along the axis of the root about four inches. This unique container can be made in sizes ranging from one quart, three gallon or five gallon with a bottom (Figures 1 and 2) to 200 gallons or more (Figure 3).
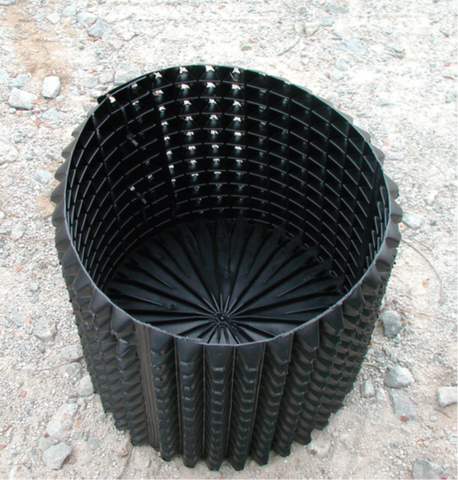
Figure 2. The one quart, three and five gallon sizes come as a kit that includes a bottom. Note the unique shaping of the network of sidewall cones and the bottom with ribs to direct roots to the side openings for further air-pruning.
Figure 3. The only limitation to the size of a RootBuilder® container is the imagination and available equipment. By using three straps to form an effective sling, this six inch stem diameter oak tree was easily lifted for positioning on a load. At the planting site, simply cut the four fasteners at the vertical connection and the container is removed with zero effort and is ready to be reused.
The one quart, three and five gallon sizes are sold as kits that include a bottom and sidewall fasteners. The bottom is flat and container sidewalls are vertical, making plants much less prone to blow over. To make a larger container, cut the desired length and fasten the two ends. Place the container ring on the optional RootTrapper® fabric disk or on a sheet of polyethylene. Install the plant as the container is filled with a good container growth medium. To remove a plant from this container, simply cut the fasteners and the root system is free. And these containers can be used over and over. Any plant develops an extremely fibrous root system, no root circling and root tips poised to grow both horizontally as well as downward at time of planting. Because plants grown in these containers establish promptly in the landscape, little plant stress occurs and losses are unlikely (Figure 4).
Figure 4. Plants grown in the unique RootBuilder® container develop an extremely fibrous root system. Roots are poised to grow in all directions radially following planting, as well as downward. And, no circling, kinking or root deformity problems.
I began studying and modifying plastic containers in 1968. Since that time much as been learned and I have created and tested an assortment of new container designs. The consistent objective has been to stop roots from circling and stimulate root branching. For the complete story on growing plants in containers, read Plant Production in Containers II, available at www.lacebarkinc.com.
]]>You may have realized that some of the trees, shrubs and plants you've planted that were grown in nurseries and garden centers die in only a few years after planting in the ground. Sometimes, you will plant a tree only to have it wither and die a year or two later. While trees can succumb to disease and while poor soil can take a few years off a plant's life, most plants die early because they literally starve to death. Their root systems are just not developed properly and weren't grown the right way. And the way the were grown - in standard plastic pots - is the culprit.
Why Circling Roots Are the Enemy
Dr. Carl Whitcomb, a leading horticulturist, former professor at Oklahoma State University, published author, researcher and holder of 26 patents, discovered that how root systems are grown early in the life of a plant can make the difference between a plant that lives a long, full life and one that dies prematurely.
His research discovered something profound: the biggest single contributor to early death was a root system dominated by circling roots.
Circling roots occur when the container in which the plant is grown is improperly designed. The roots continue to grow unchecked so that they eventually begin to circle around themselves. This creates a weakened root system that can't get enough nutrients to sustain the plant when it's transplanted from the container into the ground.
It's clear that circling roots are the enemy of any homeowner, gardener, landscaper or horticulturist. These roots are weak, underdeveloped and incapable of giving the plant the life-sustaining nutrients it needs - all because of the way they were grown.
How the Container Makes the Difference
Standard growing containers, like the ones you see in nurseries and garden centers all over the country, don't do anything to properly develop strong, fibrous root systems. The right container, however, can make all the difference because it can develop a healthy, non-circling root system in those crucial early stages of a plant's growth. These containers are specially designed to keep root growth in check in a healthy way through something called air-root pruning.
What is Air-Root Pruning
Dr. Whitcomb discovered that by carefully pruning roots as they grow, you can avoid the tangled mess of circling roots, thereby, giving each root the space it needs to grow bigger, stronger and more capable of delivering nutrients.
The process is called air-root pruning. It happens in specially designed containers that us air to wither the tips of the roots as they grow through openings in the container. When a root tip is exposed to air, it dries up and dies. This keeps the root from growing too long, just as you would prune a bush to keep it from getting out of control.
Because the tips are pruned, their growth is controlled. This allows them to get bigger and more robust. They can then absorb more nutrients as they develop. This in turn makes it more likely that the plant will survive transplantation and more likely that the plant will live a long, full life once it's planted into the ground.
Air-root pruning can save your plant's life and save your wallet from avoiding wasting money on expensive plants that will have to be replaced in a few short years.
Turn to the RootMaker System
The RootMaker System is a comprehensive system of specially designed containers and growth kits that use air-root pruning to develop plants the healthy way, from seedlings to mature plants ready for transplantation.
The RootMaker System builds fibrous root systems that are stronger and more robust than the circling root systems created by standard containers. These roots can better endure transplantation and ensure that more of the root is taken when the plant is transferred into the ground. RootMaker users report that their trees and plants live longer, are healthier and last cost less over the lifespan of the plant because they don't have to be replaced nearly as often.
RootMaker customers are individuals who are serious about their gardening and horticulture. They believe in using RootMaker containers to grow stronger root systems because they know it all starts in the roots and healthy roots can be the difference between life and death.
]]>Who invented the air-root-pruning and other root branching procedures is an interesting question.
When I arrived at Iowa State University in 1964, one of the challenges was to decide what subject / area to study for an MS and PhD. The University catalog in describing the requirements for the PhD said simply --- The student shall make a significant contribution to the knowledge in the field. --- Sounds simple enough, but, unless you know what knowledge already exists in the field, how will you know if you made a contribution? So, lots of hours in the University Library. There was nothing there about air-pruning or other methods of stimulating root branching at that time and I have followed the literature in the area closely since that time and until I began publishing early studies on the subject, nothing had been published.
One sure way to find out if an idea or invention is truly new is to file for a patent. Examiners in the U.S. Patent and Trademark Office are detail oriented and relentless to find if something had previously been in a patent or even referenced in a patent and if so, your application is rejected.
I have USA Patents on containers that stimulate root branching using air-root-pruning, root tip trapping and constriction pruning. In none of these cases have rejections been raised based on previously published findings in the area or previously patented inventions.
So, to say with absolute certainty that no one had thought of or studied this phenomenon in years prior to my involvement, that cannot be done. But it is highly unlikely based on the extensive research I have done, both in person and by following the published scientific literature. Plus, the detailed scrutiny of my various inventions in this subject area by the US patent office, yet the fact that all patents applied for were issued, seems firm confirmation.
That is my best answer to the question -- Carl Whitcomb
]]>RootTrapper® containers have several distinct advantages over other fabric containers.
Start with the basic physiological principals of plant growth. The more you work with the natural plant requirements and responses, the greater the benefits. The more you try to dictate to plants and ignore these basics, the more problems you create.
Therefore, production of seedlings or rooted cuttings should be done allowing light to lower leaves and the accrued benefits as prime objectives. Benefits from attention to these early details are many and continue throughout the life of the plant.
After a certain amount of time, which varies due to diversities in geography and growing conditions, the root system of a plant will fill a container and growth will begin to slow. Propagation containers are more sensitive than larger containers. For each container size, there is a time of good growing conditions, then a ‘window’ in which the plant should be transplanted to a larger container to prevent growth becoming restricted. Plants transplanted at the earliest desirable stage of development have consistently outperformed those not transplanted until later.
]]>
Vegetable gardening is coming to end for 2020. I have some carrots, leeks and chard to pick this week. The kale will last another few weeks. I have some compost to put down and it is done for the season.
I have been gardening for about 50 years. I have approximately. 4000 square feet of garden of which about 500 sq./ft. is permanently fenced to keep rabbits out. I also have 80 acres of which I plant a 200 to 300 foot row of potatoes. This row is moved around a lot to keep ahead of the potato bug.
For 50 years each spring I start out as an expert and each fall end up being an amateur. I try to be organic, but all plants that I grow in plugs have a soilless mix. I have a native plant nursery and we grow all our own plants. I use the soilless mix the nursery has. Once the plants are in the garden it is 100% organic, meaning no pesticides or fertilizers. I do irrigate by hand and drip irrigation.
I do very well with onions, tomatoes, potatoes, popcorn, cabbage family in general, greens, beans, cucumbers, peppers and herbs. Each year I experiment with new plants and new ways to grow them.
This year I decided to grow tomatoes and cucumbers in the greenhouse. I grew them in 15-Gallon RootTrapper Grounder containers full of soilless mix. I grew 4 cucumber plants that grew a foot every 3 days and produced 10 cucumbers in the same time period for an entire growing season. I will do that again, but only three vines. Ten cucumbers every three days is lot to eat and friends will only take so much. I will not be growing cucumbers in the garden next year.
I grew greenhouse tomatoes, both grape size and full size. The grape tomatoes were sensational. I will raise them again. However the full size tomatoes tasted like cardboard and didn’t ripen until the ones in the garden did. They are a no go next year and in their place will be peppers and eggplant.
One of my failures this year was eggplant. I covered it with fabric and the potato bugs still got them. I inspect the plants each day and did a lot of potato bug killings. I got a few eggplants.
I really love sweet potatoes, but not as much as the voles. This year I decided to outfox them. Really!!! I planted sweet potatoes in soilless mix in 15 gallon containers with irrigation. I put out box traps with two holes and two traps with no bait in each one of them. A month before I harvested the potatoes, I pulled the traps off. I wasn’t catching anything and the traps were needed elsewhere. That was a mistake, for when I harvested them the voles had helped themselves including eating through the cloth sided container. First of all, I got plenty of potatoes. I don’t have a problem with cutting off the area the voles nibbled on and eating the potatoes. However I had a very large sweet potato that they bored right through the middle of it. I asked myself, how long did it take them to do that and what else were they doing in the tunnel. I threw that one out.
More next time...
]]>(excerpts from the article by Jolene Hansen in HempGrower magazine)
Advances in container technology can help optimize plant root growth from propagation to the field.
Growers new to container production eventually learn that all pots aren’t created equal. It’s a lesson producers of mainstream container-grown horticultural crops have long known—and that progressive container companies continue to prove. Exploring technological advances in growing containers, often backed by decades of horticulture industry research and use, can help growers decide what pots best suit their needs—and their roots.
Standard plastic nursery containers are a common choice for many container growers. Used throughout the nursery and greenhouse industries, solid, straight-sided plastic pots are easy to source through suppliers nationwide. But experienced growers will tell you: This relatively inexpensive, easy-to-sterilize and re-usable option can sometimes spell trouble. Plants held in solid plastic pots often develop circling roots, which inhibit growth, complicate transplanting and limit yield.
When Matt Spitzer, founding partner of Triangle Hemp in Raleigh, N.C., moved into hemp from the hydroponic produce space, he soon discovered the negative impact solid plastic and girdling roots had on the company’s seedlings and clones—especially if Triangle had to hold starts longer than expected when field farmers faced weather delays.
In looking for solutions, Spitzer turned to the ornamental tree industry. “They were the industry that really had the biggest issue with regard to root girdling,” he shares. As he explored container options being used in the tree industry, he learned that container-grown tree roots respond differently when they hit air instead of solid container walls. Rather than circling the pot’s interior, roots stop outward growth—as though they were pruned—and instead focus on dense, fibrous, lateral growth instead.
This natural air-pruning response has spawned an industry of container companies aiming to capitalize on this reaction and optimize healthy root growth. These “aeration pots,” available in materials from papers to plastics, offer increased air-to-root interfaces that have been proven in traditional horticulture to air-prune roots, release root zone heat, discourage root disease and promote higher yields.
Working with aeration pots has been key to Triangle Hemp’s success and given rise to its rootbound-free guarantee, says Spitzer. “That actually gave us a leg up [in the] second year of production because not many people were really aware of the issue with transplants,” he says. “So, we were able to produce a superior product that was not rootbound. The people who had never planted hemp before didn’t quite know that was so important. But if you had planted the year prior, you knew it was very important.”
...
At Triangle Farm, Spitzer turned to fabric aeration containers to minimize the risk of root disease and binding roots in the company’s mother plants.
Already familiar with fabric containers and their benefits, he settled on the RootTrapper II line by RootMaker, a container company based in Huntsville, Ala., that has served ornamental tree growers for decades. These soft-sided black fabric pots are laminated with a white coating down to the bottom 2 inches of the pot. Designed to eliminate circling roots and stimulate dense lateral root branching, the air pruning pots allow drainage at the unlaminated base while the pot’s coating protects the root ball against rapid moisture loss.
“We found this RootTrapper II container was really well-made and served a purpose for our mother plants extremely well,” Spitzer says. “It just ensures that we don’t have any binding at the base of our plants. This entire line is really quite geared towards hemp production because of their root pruning capabilities.”
...
At Hemptek, a hemp farm in Oregon’s Willamette Valley, CEO Dennis McGuire approached choosing containers for the farm’s field-destined propagation with an eye on complementing the farm’s organic focus. “It’s a challenge growing starters and everything just using all-organic products,” he shares.
After buying starts from various companies, McGuire says he grew dissatisfied with tight propagation trays that left little leeway for transplant timing—a big problem in the Pacific Northwest, where fleeting weather windows can put plans on hold for weeks. As a result, he opted for plastic trays that feature an updated design to address potential root spiraling and other issues plants grown in traditional plastic pots may develop—specifically, RootMaker plastic air pruning propagation trays, which offer a graduated, multi-cell design that directs roots toward the container’s air holes.
McGuire compares air pruning and the fibrous roots it creates with the way exercise helps grow new blood vessels to transport blood and oxygen through the body more efficiently. “You can use the best soil you want, but if you don’t have the right propagation tray, the plant still won’t have the foundation—the root structure—it needs,” McGuire says.
He adds that using RootMaker’s air pruning trays from seed to field accentuates the benefits of Hemptek’s custom organic soil. The result is a sturdy transplant, free from spiraling roots, with short internodes and compact growth that withstands Pacific Northwest winds in the field, he says.
...
For growers exploring container options, Ortega says to keep the plant’s root system foremost in mind. “In cannabis and hemp, a lot of investment goes to lights. A lot of investment goes to humidity and temperature control,” he says. “This is investing in your root system. If a plant has a good root system, it’s going to be able to handle a lot of variables.” ...
View the full article -> http://magazine.hempgrower.com/article/sept-oct-2020/selecting-right-container-optimal-root-growth-hemp-cannabis.aspx
]]>
RootMakers® are designed to direct roots into openings in the container. The first root to reach an opening is usually the tap root. When this occurs, the tip dehydrates and stops growing and secondary roots form that are horizontal in growth habit. These secondary roots are dehydrated and create additional root branching.
Above Picture: Same age blueberries grown in 32-Cell RootMakers® (left) and standard tray (right). Notice the massive size difference.
For best results, we recommend using RootMaker® propagation trays on top of a wire bench or other support that allows airflow, 18 to 24” above the floor to allow good air circulation and thus efficient air-root pruning on all sides of the container,
not just the bottom.
Above Picture: Left, oak in standard plug. Right, Oak in RootMaker® 18 Cell, 20 days after germination.
RootMaker® propagation containers can be filled with a mix of peat and perlite 40/60, or pine bark, peat and perlite at 50/30/20 by volume. Add 1.0 pound of Micromax® micro-nutrients, 3 pounds of dolomite, and 6 pounds of Osmocote® 18-6-12 (no substitutes) per cubic yard of mix.
The length of time in RootMaker® propagation containers varies, depending on the plant, but it is typically between 2 to 4 months.
Above Picture: Root system created by RootMaker® Express Propagation Container.
RootMaker® products are considered the premier fibrous root production tool by leading nurseries around the world. RootMaker® containers have been designed to provide maximum air-root pruning. The benefits of a fibrous root system are proving to be tremendous for ANY plant from vegetables to trees, whether organically grown or with standard commercial practices. Increased root surface area equals increased plant efficiency.
Above Picture: Courtesy of Leu Gardens, Orlando, FL. "Both plants are the same variety (ornamental cabbage 'Crane Bicolor') and were grown side by side: one in RootMaker® trays (left), the other in a conventional 24 cell tray (right). Same soil, light, water, fertilizer." --- Robert E. Bowden, Executive Director, Leu Gardens.
]]>
Figure 1. When a seed germinates, the primary or taproot rapidly extends downward to secure the new plant in place and access moisture critical to survival. Both oak seeds germinated four days earlier. Note the unchecked taproot to the left that has yet to develop secondary root branching. By contrast, the taproot to the right was air-pruned four inches below the seed. With dehydration of the tip of the taproot, secondary roots quickly form along the vertical axis and began expansion horizontally.
Root systems of any plant can be transformed into a more efficient complex by starting with seed germination in RootMaker® propagation containers (Figure 1). This transformation begins a few days after seed germination when the tip of the taproot reaches the bottom and is air pruned. When a root tip is guided into an opening and exposed to air it dehydrates and dies. Air-root-pruning has the cultural advantage of pruning without toxic chemicals or creating open wounds. Unlike a cut root, an air-pruned root tip has been effectively cauterized, leaving little chance of pathogen entrance. The tip of all roots, but especially the tip of a vigorous taproot produces hormones that suppress production of secondary roots along the root axis. The same phenomenon is in progress above ground --- repeatedly remove tips of branches of a shrub and soon you have a thick hedge. RootMaker® container designs not only air-root-prune at the bottom, but also at strategically placed openings in the sidewall. The end result is at time of transplanting a network of root tips aimed to grow in all directions radially as well as downward (Figure 2).
Figure 2. These catalpa tree seedlings were grown in 18 Cell RootMaker® Trays, then transplanted and allowed to grow for 0, 4, 8 and 12 days. Not only were the seedlings quickly established, but root-soil contact is far greater than with conventional production. Perhaps it could be called --- No nutrient left behind.
Organic fertilizers are dependent on microbial activity for decomposition and nutrient release. Oxygen and temperature play key roles in microbial activity. Therefore, nutrient release is greater near the soil surface. By creating a fibrous
root system that expands into soils near the surface, nutrient absorption improves.
Another factor that benefits from improved root structure and branching is symbiotic mycorrhizae association. Mycorrhizae colonize only healthy roots with energy (sugars) to share. By improving nutrient absorption and transfer to leaves, a greater quantity of energy is produced and shared with the root system.
Plants propagated in cone-shaped plugs or conventional round containers that encourage circling roots and minimize root branching typically grow taller and more slender and have fewer flowers and fruits (Figure 3.). By contrast, plants propagated in RootMaker® containers are shorter with stouter stems and more flowers and fruits. An improved root system pays dividends in all aspects of plant growth, health, flowering and fruiting. Plant growth and productivity is all about energy and an improved root system is a major contribution.
Figure 3. Roots of an oak seedling with well developed root system ready to plant in the field. Plants removed from plug trays (left) versus 32 Cell RootMaker Trays (right) as they looked when removed from the tray after 10 days of root extension. Typically, nearly all roots from a seedling grown in a plug-type container grow downward. By contrast, roots from plants propagated in RootMaker® containers produce roots that grow radially as well as downward.
]]>We may not be at war but with stay at home orders and empty grocery stores, many people are looking to their backyard spaces to grow their own food. Whether you're a seasoned gardener wanting to expand or a beginner, we've got 5 tips to help you get started:
1. Know Your Zone. It is important to know what zone you are in to plant at the appropriate times. You can easily find your zone here. Sign up for personalized planting reminders to receive emails for planting according to your area. Even the back of many seed packs will tell you the optimal planting time for that particular seed.
2. Choose a Location. You will need an area that receives 6+ hours of sun for most plants. How is your dirt? Do you have rich soil or mostly clay? This will determine if you are going to plant in-ground or utilize raised beds and containers. Do you have easy access to water? Be sure to consider these things when selecting where to plant.
3. Decide What to Grow. Do you and your family love tomatoes and carrots? If you're just starting out, focus on planting those. Maybe add a few radishes and lettuce to make your own salads and try something new. Do not plant 6 banana pepper plants if no one in the house will eat them! It will be a waste of time and effort when you could be growing more food in that space your family will enjoy.
4. Order Your Seeds. Many online seed stores are shipping with a delay. Be sure to get your seed order right away. And if it's available, support your local garden stores for seeds and starter plants. Many local stores are offering contactless curbside pickup.
5. Be Fearless. Every year, every garden will be different due a variety of factors, primarily weather and pests. The important thing is to keep trying. Plant what you want where you want. Only have balcony space and love caprese salad? Plant a tomato and basil plant in a container and watch what happens. Try something new and push your limits.
Once you've found your zone, chosen a location, decided what to grow and ordered your plants, you are well on your way to your Victory Garden 2.0. Not only will you be providing healthy, nutritious food for your family, but you will be giving yourself a healthy, rewarding past-time as well.
]]>What About Spring?
Most people think of Spring as the best time to plant anything, but for trees and shrubs, there are a few reasons this may not be true:
What Should I Plant?
Trees to Plant in Fall: alder, ash, buckeye, catalpa, crabapple, hackberry, hawthorn, honey locust, elm, Kentucky coffee tree, linden, maple, sycamore, pines, and spruces.
Trees to Plant in Spring: bald cypress, American hornbeam, ginkgo, larch, magnolia, hemlock, sweetgum, tulip tree, and willow. Also broad-leaved evergreens such as rhododendrons and narrow-leafed evergreens such as yews prefer spring planting.
Timing is Everything
If you do decide to plant in the fall, the best time is approximately 6 weeks before the first hard frost. Plant roots will grow anytime the soil temperature is 40 degrees or higher, so 6 weeks will give you ample time before the ground freezes and winter sets in. Depending on your zone this could be anywhere from late August to November.
No matter what time of year you decide to plant your trees and shrubs, remember to always mulch and water.
Happy Fall Y'all!
]]>
2. Get filling. Fall is a great time to start your compost pile. Alternate filling the composter with grass clippings (green material) and leaves (brown material). Ideally you want a 4:1 ratio of green to brown material, but don’t worry if it’s not exactly right. Your pile may just take longer to decompose. Tip: Do not add any diseased plants OR poison ivy, poison sumac, or poison oak.
3. Add Household Scraps. Things like coffee grounds with filters, eggshells, banana or other fruit peels, vegetable scraps and stale bread are all great things to add to the compost pile. You can also add paper towel and toilet paper cardboard rolls, tea bags, Kleenex, and even human hair! All these things will add more diversity and nutrients to your compost pile while reducing your household waste. Tip: Do not add meat or dairy products.
4. Water the Pile. Sprinkle water over your compost regularly. It will need to be moist like a sponge. If the pile is too dry, the contents will take longer to compost. If the pile is too wet, the contents may begin to smell.
5. Stir the Pile. Depending on your style of composter, this will need to be done once a week with a garden fork. This will provide the pile with oxygen and prevent the materials from being matted down. Types of composters such as a tumbler system make this process easier, but our personal favorite is the RootMaker Enhanced Aeration Composter which requires no stirring!
6. Feed Your Garden. Finished compost can take anywhere from 2 months to 2 years depending on the size and ratio of materials, and the frequency of watering and stirring. Your compost is ready when it is dark, crumbly and smells like earth. Add 4-6” of your black gold to your gardens beds and pots to feed and enrich your soil.